
In today’s data-driven world, organizations rely on analytics tools like Power BI to derive actionable insights from vast datasets. However, the accessibility of this data comes with a critical challenge: ensuring that users can only view the data they are authorized to see. This is where Row-Level Security (RLS) in Power BI steps in.
RLS is a robust mechanism that restricts data access based on predefined rules or dynamic conditions. It ensures sensitive information remains secure, allowing users to work efficiently without compromising privacy or compliance. Whether you’re managing confidential sales records or sensitive customer information, RLS empowers organizations to safeguard their data effectively.
This article unpacks the concept of RLS, delves into the differences between static and dynamic approaches, and provides actionable steps for implementing both methods. Additionally, it explores the DAX (Data Analysis Expressions) functions that make RLS a powerful and flexible tool in Power BI.
Contents
What is Row-Level Security (RLS)?
Row-Level Security (RLS) is a feature in Power BI that applies rules or filters to a dataset, ensuring users can only view specific rows of data. By restricting access at the row level, RLS helps organizations enforce strict data governance policies while maintaining user productivity.
Why RLS Matters
- Data Privacy: Ensures that sensitive information, such as personal data or financial records, is visible only to authorized users.
- Compliance: Meets legal requirements for data protection, such as GDPR or HIPAA.
- User Experience: Simplifies report navigation by displaying only relevant data to each user.
- Scalability: Supports secure, enterprise-wide reporting for hundreds or thousands of users with varying access levels.
RLS is a critical feature for businesses operating in industries like finance, healthcare, and retail, where data security and compliance are non-negotiable.
Static Row-Level Security
How Static RLS Works
Static RLS involves the manual creation of roles and filters that define which data rows a specific user or group can access. These roles are hardcoded into the dataset, and the associated filters do not change based on the logged-in user.
For example, consider a sales organization with data divided by regions:
- A role called “North Region Manager” might filter data to show only records where the Region column is “North.”
- Users assigned to this role will always see only data for the North region, regardless of their login credentials or attributes.
When to Use Static RLS
- Small Teams: Ideal for environments with a limited number of users and straightforward access needs.
- Stable Roles: Suitable when user roles and permissions rarely change.
- Single Reports: Effective for one-off reports where reusability across multiple datasets is not a concern.
Advantages
- Simple to set up and manage for small datasets.
- Reliable for fixed, unchanging data access requirements.
Disadvantages
- Not scalable for large organizations or dynamic environments.
- High maintenance: Role or permission changes require manual updates to the filters.
- Redundant effort: Separate filters must be configured for each report.
How to Implement Static RLS in Power BI
- Prepare the Dataset
- Ensure the dataset contains fields like Region, Department, or Role that can be used for filtering.
- Define Static Roles in Power BI Desktop
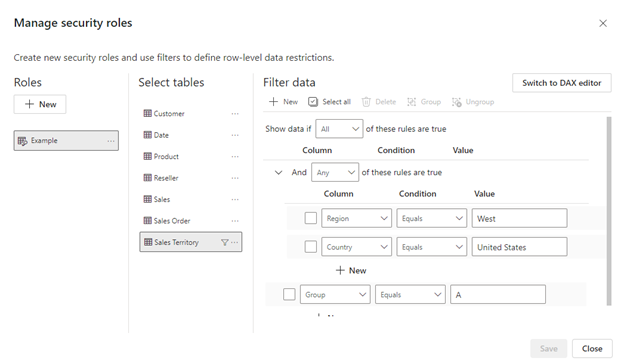
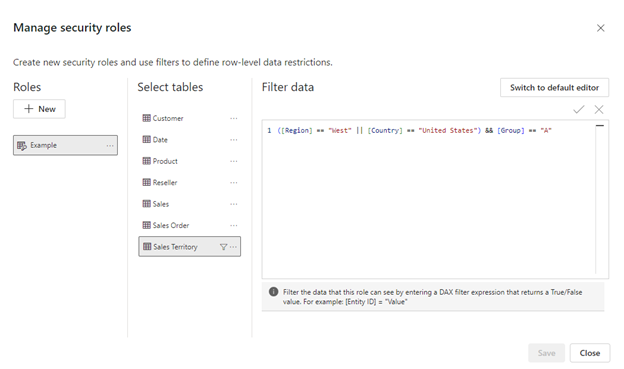
- Go to the Modeling tab and click Manage Roles.
- Click Create and name the role (e.g., “NorthRegionManager”).
- Select the relevant table and apply a filter condition. For example: [Region] = “North”
- Test Roles in Power BI Desktop
- Use the View as Roles option under the Modeling tab.
- Select the role to confirm that only the filtered data is displayed.
- Publish and Assign Roles in Power BI Service
- Publish the Power BI report to the Power BI Service.
- Navigate to the dataset’s Security settings and assign users or groups to the roles.

Dynamic Row-Level Security
How Dynamic RLS Works
Dynamic RLS uses user attributes, such as their email address or username, to filter data dynamically. Instead of creating multiple roles manually, a single configuration dynamically adapts based on who is logged in.
For example:
- A salesperson logs in to Power BI using their corporate email (e.g., john@company.com). Dynamic RLS uses this information to filter the data, allowing the salesperson to view only their sales records.
When to Use Dynamic RLS
- Large Organizations: Managing roles for thousands of users becomes efficient.
- Frequent Role Changes: Automates access updates when users switch roles or departments.
- Enterprise-Wide Reports: Centralized configuration supports multiple datasets and reports.
Advantages
- Automated role assignment eliminates manual updates.
- Highly scalable for dynamic work environments.
- Centralized management reduces redundant configurations.
How to Implement Dynamic RLS in Power BI
- Prepare the Dataset
- Ensure the dataset includes relationships between the main data table and a user permissions table.
- Example: The permissions table contains columns like Email, Role, and Region.
- Define Dynamic Roles in Power BI Desktop
- Go to the Modeling tab and click Manage Roles.
- Create a new role and use DAX functions like USERPRINCIPALNAME() to filter rows dynamically. Example: [Email] = USERPRINCIPALNAME()
- Publish and Assign Users
- Publish the report to Power BI Service.
- Assign the roles under the dataset’s Security settings.
- Test the Configuration
- Log in as different users to verify that only authorized data is displayed.

Key DAX Functions for RLS
Dynamic RLS relies on several DAX functions to filter data based on user attributes. Here are the most commonly used functions:
- USERPRINCIPALNAME(): Returns the logged-in user’s email or username.
- LOOKUPVALUE(): Dynamically retrieves roles or permissions based on user attributes.
- FILTER(): Applies row-level filtering with complex conditions.
- CONTAINS(): Checks if a value exists in a table.
- RELATED(): Retrieves related information from a connected table.
- AND() / OR(): Combine multiple conditions for advanced filtering.
Practical Demonstration
Let’s consider a sales dataset:
| Date | Salesperson | Amount |
|---|---|---|
| 2024-01-01 | John | 500 |
| 2024-01-02 | Jane | 300 |
| Salesperson ID | Name |
| 1 | John |
| 2 | Jane |
Static RLS Example:
- Define a filter for “John” with the condition [Salesperson] = “John”.
Dynamic RLS Example:
- Use USERPRINCIPALNAME() to automatically filter records based on the logged-in user: [Email] = USERPRINCIPALNAME()
In this example:
- John sees only his sales records.
- Jane sees only her sales records.
Conclusion
Static and Dynamic RLS are indispensable tools in Power BI, catering to different organizational needs. While static RLS is ideal for small teams and stable environments, dynamic RLS offers automation, scalability, and flexibility for modern enterprises.
Mastering these techniques and the associated DAX functions ensures secure and efficient data management, empowering organizations to make informed decisions confidently.
Learn more about Row-Level Security in Power BI from Microsoft’s official documentation.
Too see some of my projects with Power BI check here.